DIY VPN with Docker
![]()
I’ve worked with both ExpressVPN and NordVPN. Both are great services but, from my perspective, have one major shortcoming: they’re currently blocked by Amazon Web Services (AWS). When using either of them you are simply not able to access any of the AWS services.
The most common scenario in which I’d be using a VPN is if I’m on a restrictive network where I’m only able to access web sites. Typically just ports 80, 8080 and 443 are open. Forget about SSH (port 22), SMTP (ports 25, 465 and 587) or NTP (port 123). I want to be able to connect by SSH to my AWS servers, send mail over SMTP and synchronise my clock. The latter items are normally possible over commercial VPN providers (like ExpressVPN and NordVPN) but not being able to connect to AWS is a deal breaker.
Luckily there is a simple solution: run your own VPN server. Using a low end cloud instance on AWS or DigitalOcean (costing $5 or less per month) this is eminently plausible.
Launch a Cloud Server
Obviously this step needs to be done before you actually need the VPN! Spin up a minimal Ubuntu server on the cloud service of your choice (we’ll be using AWS for illustration). 🚨 Ideally you should allocate a persistent IP address (and DNS name) to this instance so that it won’t move to a different network location on restart.
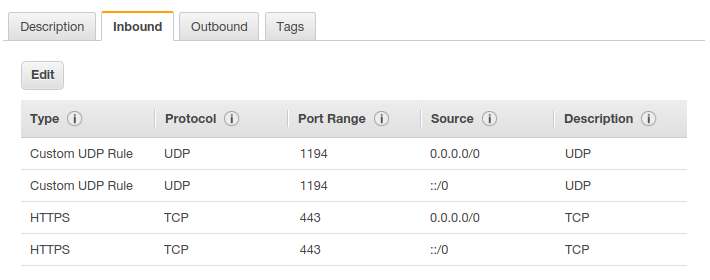
Open ports 1194 (UDP) and 443 (TCP) on the server.
Make a SSH connection to the remote server (assuming that port 22 is open by default!). The instructions which follow should all be executed on the remote server.
Preliminaries
We’re going to need Docker, so install it now! We’ll be using the kylemanna/openvpn Docker image (source repository is here). Start by pulling the image.
OVPN_IMAGE="kylemanna/openvpn:2.4"
OVPN_DATA="ovpn-data"
docker pull $OVPN_IMAGEThe VPN configuration and certificates will be stored in a Docker volume. Create that now.
docker volume create --name $OVPN_DATAYou can check the contents of this volume using the following:
sudo ls /var/lib/docker/volumes/ovpn-data/_dataGrab the (public) DNS name for the server and stash it in a shell variable.
DNSNAME="ec2-18-218-49-6.us-east-2.compute.amazonaws.com"To reduce the volume of logging information it can be handy to include the --log-driver=none option with the following invocations of docker.
UDP
First we’ll set up a VPN operating over UDP on port 1194. From a bandwidth perspective this is efficient, but this port may well be closed (in which case see the TCP option below).
Generate the OpenVPN configuration.
docker run -v $OVPN_DATA:/etc/openvpn --rm $OVPN_IMAGE ovpn_genconfig -u udp://$DNSNAME -bInitialise the EasyRSA Public Key Infrastructure (PKI).
docker run -v $OVPN_DATA:/etc/openvpn --rm -it $OVPN_IMAGE ovpn_initpkiEnter and verify a suitable private key (PEM) pass phrase when prompted. 🚨 Don’t leave this empty!
At the prompt for a Common Name, just accept the default. Boil the kettle. Enter the pass phrase when prompted. And again.
Launch the OpenVPN daemon process.
docker run --rm --name openvpn -v $OVPN_DATA:/etc/openvpn -d -p 1194:1194/udp --cap-add=NET_ADMIN $OVPN_IMAGETCP
Execute the commands below for a VPN over TCP on port 443 (this is the port for HTTPS, so is almost definitely going to be open, no matter how repressive the network!).
# This runs quickly and requires no input.
docker run -v $OVPN_DATA:/etc/openvpn --rm $OVPN_IMAGE ovpn_genconfig -u tcp://$DNSNAME:443 -b
# This takes a little longer and requires you to enter a passphrase.
docker run -v $OVPN_DATA:/etc/openvpn --rm -it $OVPN_IMAGE ovpn_initpki
Launch the daemon.
docker run \
  -d \
  --restart always \
  --name openvpn \
  -v $OVPN_DATA:/etc/openvpn \
  -p 443:1194/tcp \
  --cap-add=NET_ADMIN \
  $OVPN_IMAGE
Creating Users
Regardless of whether you are creating a VPN over TCP or UCP, you now need to create the configuration file which will be used with the openvpn client on your local machine.
User without password
Let’s set up a key for Alice.
docker run -v $OVPN_DATA:/etc/openvpn --rm -it $OVPN_IMAGE easyrsa build-client-full alice nopassEnter the pass phrase when prompted. Now dump the configuration file.
docker run -v $OVPN_DATA:/etc/openvpn --rm $OVPN_IMAGE ovpn_getclient alice >alice.ovpnUser with password
How about a key for another user, Bob?
docker run -v $OVPN_DATA:/etc/openvpn --rm -it $OVPN_IMAGE easyrsa build-client-full bob
docker run -v $OVPN_DATA:/etc/openvpn --rm $OVPN_IMAGE ovpn_getclient bob >bob.ovpn
We didn’t specify the nopass option for Bob, so he’ll need to provide a password every time that he connects. This is probably a good idea!
Connecting
Now we need to test the VPN. Disconnect from the server. Back on your local machine use SFTP or SCP to get a local copy of the .ovpn file from the server.
Install OpenVPN.
sudo apt install openvpnConnect to the VPN.
sudo openvpn --config alice.ovpnIf everything goes well then you should see “Initialization Sequence Completed”. Confirm that your effective IP address is now that of the VPN server. Enjoy!
VPN Maintenance
There are some routine tasks that you may need to perform on the VPN machine from time to time.
List Registered Users
Use the following command to get a list of registered users:
docker run -v $OVPN_DATA:/etc/openvpn --rm $OVPN_IMAGE ovpn_listclientsThe output will look something like this:
name,begin,end,status
alice,Nov 16 16:25:45 2021 GMT,Feb 19 16:25:45 2024 GMT,VALID
bob,Nov 19 09:46:50 2021 GMT,Feb 22 09:46:50 2024 GMT,VALID
Revoking User Access
What about removing access for a specific user?
docker run -it -v $OVPN_DATA:/etc/openvpn --rm $OVPN_IMAGE ovpn_revokeclient aliceNote: The extra -it option is important because you’ll be required to interactively confirm that you want to remove access for this user.
The command above will revoke access for the specified user. You can be a little more aggressive and delete the certificates for that user by adding in the remove option.
docker run -it -v $OVPN_DATA:/etc/openvpn --rm $OVPN_IMAGE ovpn_revokeclient alice removeChange Pass Phrase
In the interests of keeping things secure you might want to cycle the pass phrase for the VPN from time to time. Note: I’m referring to the pass phrase required to administer the VPN (for operations like adding new users) rather than a password used to connect to the VPN.
We’ll changing the passphrase for the file /etc/openvpn/pki/private/ca.key. To do this we’ll launch a shell within the running VPN container.
docker exec -it openvpn /bin/bashYou’ll notice that the shell prompt will change to #, indicating that you are now the root user inside the container.
Change to the directory containing the ca.key file and create a backup copy.
cd /etc/openvpn/pki/private/
cp ca.key backup-ca.key
Now update the passphrase.
openssl rsa -des3 -in ca.key -out updated-ca.keyYou’ll need to provide the old passphrase once and then the new passphrase twice. If everything went smoothly then you can replace the old file with the new one.
mv updated-ca.key ca.keyIt’s also possible to completely remove the passphrase. Definitely not a secure option and probably a very bad idea.
openssl rsa -in ca.key -out updated-ca.key
mv updated-ca.key ca.key
EC2 Maintenance
Suppose that you need to perform some maintenance on the VPN cloud instance.
Stop the VPN.
docker stop openvpnDo the maintenance.
Start the VPN.
docker stop openvpnRather simple. However, if the maintenance results in a new IP address or DNS name for the instance then this will break the VPN configuration files. They can easily be fixed though. 🚨 If you assigned a persistent IP address and DNS name when creating the instance then this will not be a problem.
Suppose that before the maintenance the VPN was located at ec2-18-197-117-80.eu-central-1.compute.amazonaws.com. Near the top of the .ovpn configuration files you’d find something like this:
remote ec2-18-197-117-80.eu-central-1.compute.amazonaws.com 443 tcpIf after the maintenance the VPN is located at ec2-18-197-125-33.eu-central-1.compute.amazonaws.com then update each of the .ovpn configuration files to:
remote ec2-18-197-125-33.eu-central-1.compute.amazonaws.com 443 tcpConclusion
This setup is simple and cost effective. Typically I’ll only need a VPN for a few days in succession, so it’s very convenient that I can literally spin up a VPN when I know that I’m going to need it, then take it down when I’m done. No long term commitment. No hassles accessing any port or protocol I need.