If you’re thinking about using encrypted email, then Mailfence appears to be a pretty good option for getting started in a relatively painless way.
You can sign up on the Free plan, but it might make sense to request a 15 day trial of the Entry plan in order to get a feel for other features like access to an SMTP server (which will allow you to use Mailfence from your desktop email client).
Out of the box your Mailfence account will be ready to send and receive emails. However, there’s more work required if you want to use encryption to sign or encode messages.
Mailfence offers two options for message encryption:
- password encrypted and
- OpenPGP encrypted.
The first option is quick and simple, based on symmetric key cryptography (specifically using the AES algorithm). You specify a password that’s used to encrypt the message. That same password will also be required to decode the message (this is where the “symmetric” comes from). You can optionally provide a password hint and specify a period after which the password expires (and the message becomes inaccessible). The principle advantage of this approach is that it requires zero setup (for either you or the recipient). The major disadvantage is that the onus is on you to share the password securely with the message recipient.
The second option uses asymmetric encryption and requires a little more effort to get set up: both you and your correspondent need to create a (public and private) key pair. You can share your public key with anybody (hence the “public”) but your private key must be kept secure. Messages are encrypted using the public key and decrypted using the private key. This is certainly my preferred approach. Although I did experiment with the symmetric encryption option (and it certainly should come in handy from time to time), this is the approach that I would use systematically.
The rest of this post describes the set up process for asymmetric encryption.
Create a Personal Encryption Key
You’re going to need a keypair associated with your Mailfence account in order to sign messages and also decrypt encoded messages sent to you.
- Go to Settings → Messages → Encryption.
- Press the Add personal key link and then the button.
- Specify a passphrase. Choose something secure but memorable. Take heed of the warning:
The passphrase cannot be restored or recovered in any way. If forgotten, you will not be able to decrypt encrypted data or sign new messages with this keypair.
- Press .
- Press for generating a revocation certificate and provide the passphrase that you specified earlier. You can equally press here and generate the certificate later.
- Download the revocation certificate and press .
Your keypair is ready to use. But before it can be really useful you need to share it with the world.
Publishing a Personal Encryption Key
You can export your public key and share this directly with your correspondents.
- Go to Settings → Messages → Encryption.
- Click on the link under My personal keys.
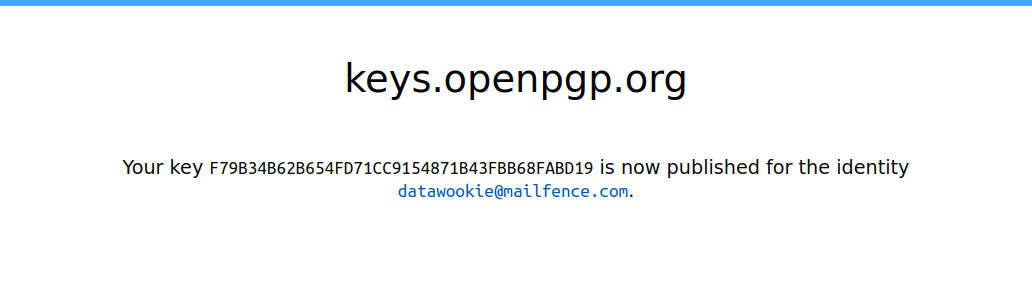
- Click on the Publish on keys.openpgp.org link.
- You’ll need to verify that you own the account linked to the key. Go to your Mailfence inbox and open the message from keyserver@keys.openpgp.org.
- Click on the link in the message. You’ll be redirected to a page on https://keys.openpgp.org/ which announces that your public key has been published.
Importing
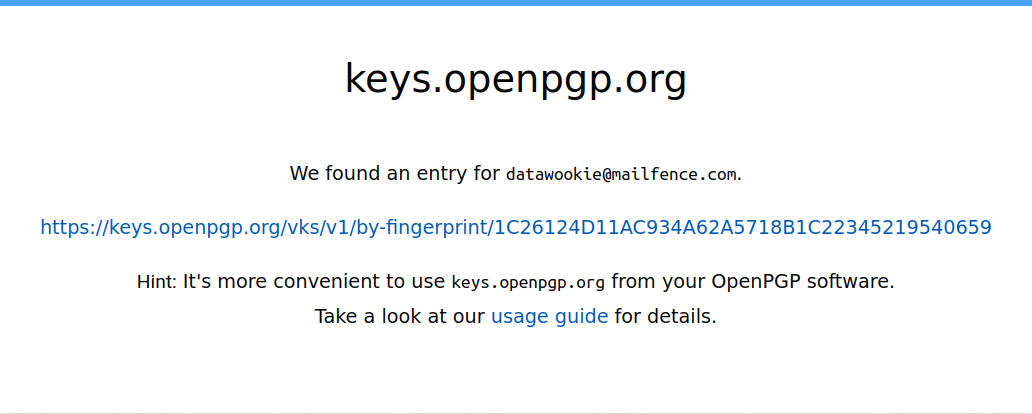
Your correspondents can now access your public key by going to https://keys.openpgp.org/ and searching either using your Mailfence email address or the key fingerprint.
They can also import the key directly from the OpenPGP key server.
gpg --keyserver keys.openpgp.org --recv-keys F79B34B62B654FD71CC9154871B43FBB68FABD19
gpg: key 71B43FBB68FABD19: public key "Andrew Collier <datawookie@mailfence.com>" imported
gpg: Total number processed: 1
gpg:               imported: 1
With your public key on their keychain, your correspondents will be able to send encrypted messages to your Mailfence account.
This doesn’t help us send an encrypted message though. We still need to add a public key to our Mailfence account for the person that we want to message.
Adding a Public Key to Mailfence
Next we’ll import a public key into Mailfence. You’ll need to import the public key for anybody that you want to send a message to using asymmetric encryption.
- Go to Settings → Messages → Encryption.
- Click on the Add public key link.
- Press .
- Specify the email or fingerprint associated with the key. Using a key fingerprint is by far the most reliable approach.
- Press .
- If there’s a match then the result will be shown. Click the matching entry (there might only be one but you’ll still need to select it). Then press .
- If there are no matches then press .
If the search was unsuccessful then you’ll need to have a copy of the required public key.
- Go to Settings → Messages → Encryption.
- Click on the Add public key link.
- Press .
- Paste the key.
- Press .
The key should be added under Other public keys.
Sending an Encrypted Message
- Go to your Mailfence inbox.
- Press .
- Add the recipient’s email address.
- Press and then .
- Add a subject and message content.
- Press .
Provided that you have already imported the recipient’s public key your message will be encrypted and dispatched. They will receive it in their inbox and immediately be able to decrypt the contents using their private key.