SSH tunnels are a powerful and secure method for transmitting data over potentially unsecured networks. They allow users to establish an encrypted connection between their local machine and a remote server, providing a secure and private pathway for data. An SSH tunnel will allow a service running on a remote machine to appear as if it is running on a local machine. This is also known as port forwarding.
Why?
Why would you need an SSH tunnel? Suppose that you need to access a database server within a corporate network or on a private AWS network. The database server is intentionally inaccessible from the public internet and there’s no way to establish a direct connection to the database. However, if you have access to an SSH server on the same network and it’s possible to establish a connection from the SSH server to the database server, then an SSH tunnel can be used to establish a connection to the database server from outside the private network.
Anatomy of a Tunnel
What makes up an SSH tunnel?
- Local Host
- The computer from which the SSH tunnel is initiated. This is where you run the SSH client software and is most often your local laptop or desktop machine.
- SSH Server
- The machine running the SSH server. The SSH connection is made between the local host and the SSH server. This is generally a well secured server and is also known as the “bastion host” or “jump host”.
- Remote Host
- The machine that you are actually wanting to connect to.
- Local Port
- The port on the local host which us used as the entry point to the SSH tunnel. Data sent through this port is securely forwarded to the remote host and data from the remote host is returned via this port.
- Remote Port
- The port on the remote host which is used to handle data arriving or leaving via the SSH tunnel. The remote port will determine which service on the remote host will handle the data.
The diagram below illustrates how these components relate to each other. The local host resides completely within the public network, while the remote host is exclusively within the private network. The SSH server straddles the two networks and is accessible in both of them. The local host establishes an SSH connection to the SSH server. This links port 22 on the local host to port 22 on the SSH server. The SSH connection provides a conduit for a connection from port 3306 on the local host to port 3306 on the remote host. This connection goes through the tunnel and then via the SSH server to the remote host. Because these hosts are on separate networks the local host and remote host would not be able to communicate without the tunnel.

Two Types of Tunnel
There are two types of SSH tunnel: local and remote.
A local SSH tunnel is initiated from the local host (the machine you are connecting from) and establishes access from the local host to a resource on a private network.
A remote SSH tunnel is initiated from the SSH server and allows access to a resource on a private network from an external SSH client.
The primary differences between the commands used to establish these two types of connections are:
- the flag
-Lfor local and-Rfor remote; and - the detailed configuration of the ports and hosts.
We’ll be focusing on local SSH tunnels in the remainder of this post and remote SSH tunnels will be discussed in the next post.
Server Setup
For the purpose of illustration I have set up three machines:
- the remote host is an EC2 instance with no public IP address;
- the SSH server is an EC2 instance with both public and private IP addresses; and
- the local host is my laptop.
Remote Host
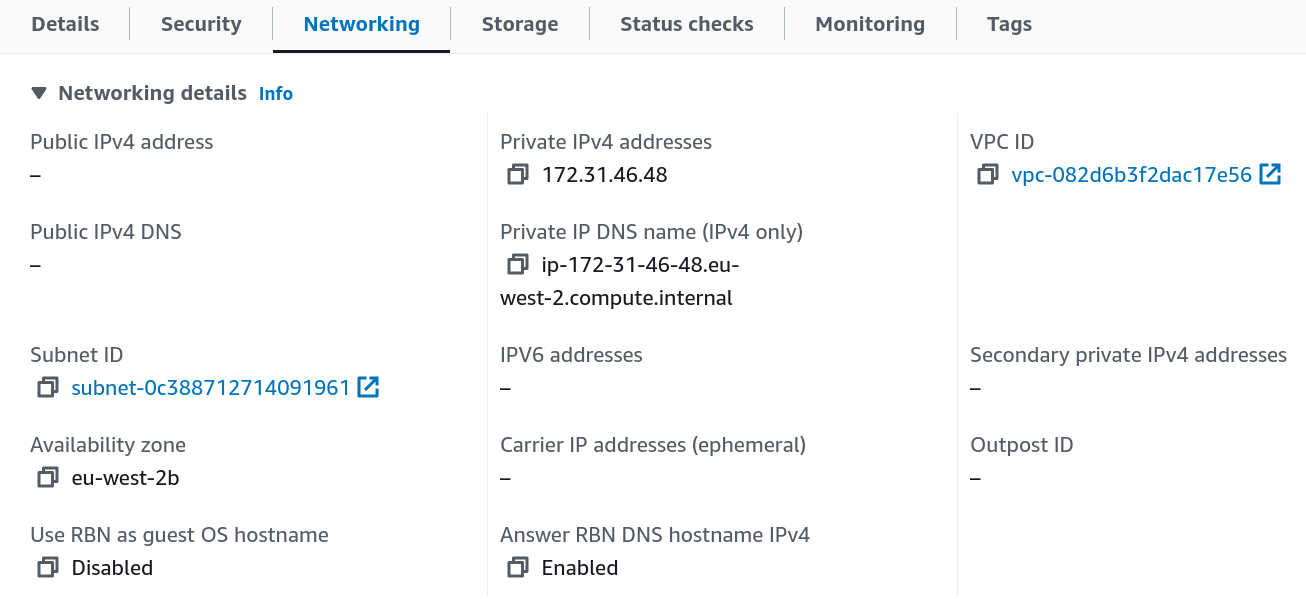
Here are the networking details for the remote host:
- private IP address:
172.31.46.48and - private DNS name:
ip-172-31-46-48.eu-west-2.compute.internal.
Security groups are set up so that it accepts connections on port 3306 (MySQL).
It’s running a MySQL server via Docker.
docker run -p 3306:3306 -e MYSQL_ROOT_PASSWORD=password -d mysql:5.7.44An alternative option for a similar remote host would be a MySQL RDS instance.
SSH Server
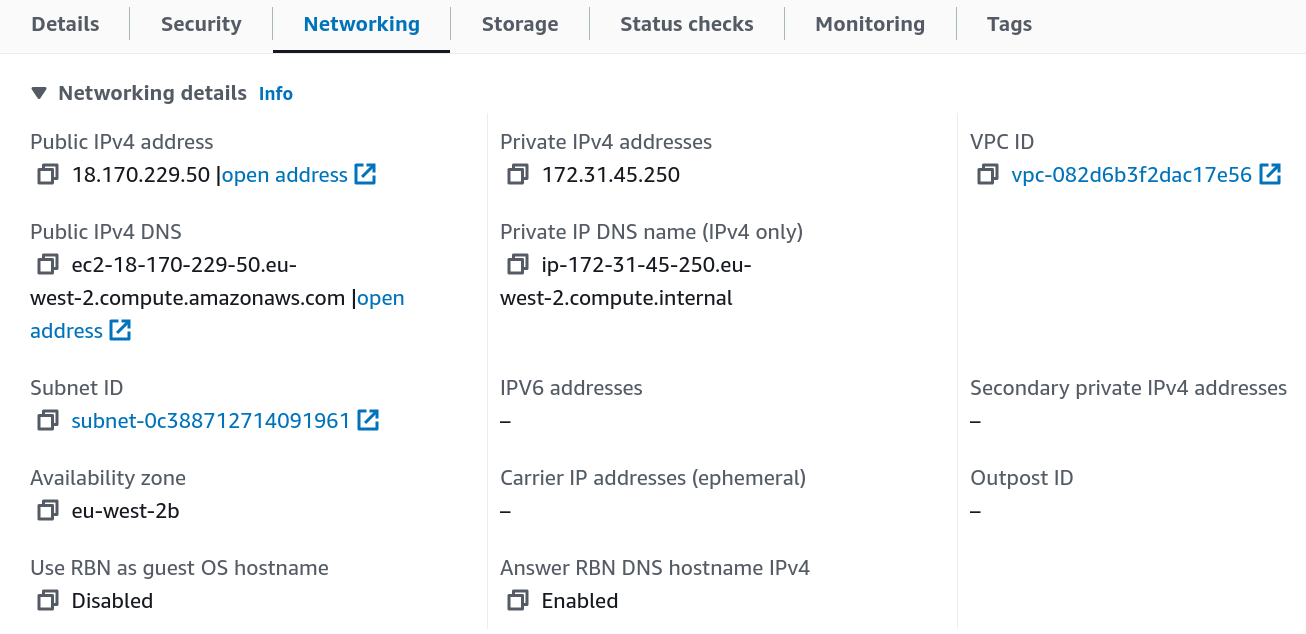
These are the networking details of the SSH server:
- public IP address:
18.170.229.50 - public DNS name:
ec2-18-170-229-50.eu-west-2.compute.amazonaws.com - private IP address:
172.31.45.250and - private DNS name:
ip-172-31-45-250.eu-west-2.compute.internal.
A security group is configured to allow connections on port 22 (SSH).
The SSH server is running the SSH daemon, which needs to be configured to allow port forwarding. Edit the /etc/ssh/sshd_config configuration file and check the value assigned to AllowTcpForwarding.
AllowTcpForwarding yesYou can set this to
yesorallto allow both local and remote port forwarding (the default)localto allow only local port forwardingremoteto allow only remote port forwarding andnoto prevent port forwarding.
Tunnel to a MySQL Database
Since the remote host has no public IP address I cannot create a direct connection to the MySQL database. In order to access that database I need to create an SSH tunnel.
# Create an SSH tunnel which will forward port 3306 on local host to port 3306 on remote host.
ssh -L 3306:172.31.46.48:3306 ubuntu@18.170.229.50
Here’s a breakdown of the components of that command:
- the
-Lflag indicates a local SSH tunnel; 3306:172.31.46.48:3306specifies that port 3306 on the local machine should be forwarded to port 3306 on the remote host (specified via private IP172.31.46.48); and- username
ubuntushould be used to connect to the SSH service on52.101.101.57(the public IP of the SSH server).
💡 You can refer to the remote host and SSH server using either an IP address or a DNS name. I’ll be using IP addresses.
You will immediately be able to connect to MySQL on the remote host from the local host.
# Connect to MySQL on the remote host via the SSH tunnel.
mysql -h 127.0.0.1 -P 3306 -u root -p
How does this work?
- The local host establishes an SSH connection on port 22 to the SSH server.
- The SSH client on the local host starts listening for local connections on port 3306.
- An application (typically a MySQL client) opens a connection on port 3306 on the local host.
- The SSH client opens a channel to the SSH server.
- The SSH server connects the channel to port 3306 on the remote host.
- Traffic is proxied by SSH via the channel between port 3306 on the local host and port 3306 on the remote host.
The above SSH command will create an interactive SSH connection to the SSH server. You probably don’t actually need an interactive session, in which case you can create a non-interactive tunnel by adding the -N flag.
ssh -N -L 3306:172.31.46.48:3306 ubuntu@18.170.229.50You can also launch the tunnel in the background via the -f flag.
ssh -f -N -L 3306:172.31.46.48:3306 ubuntu@18.170.229.50If you have the authentication credentials for the SSH server stored in a PEM file, say bastion.pem, then this can also be specified via the -i parameter.
ssh -i bastion.pem \
  -L 3306:172.31.46.48:3306 \
  ubuntu@52.101.101.57
What if port 3306 is already in use on the local host? For example, you might already be running a MySQL server locally. In this case you can change the local port for the tunnel.
ssh \
  -L 4000:172.31.46.48:3306 \
  ubuntu@52.101.101.57
Bind Address
When port forwarding is active on the local host any other machine with access to the forwarded port on the local host is able to communicate via the tunnel. However, you can lock this down to only the local host by adding a bind address.
# Add a bind address for the local host (using either 127.0.0.1 or localhost).
ssh -L 127.0.0.1:3306:172.31.46.48:3306 ubuntu@18.170.229.50
ssh -L localhost:3306:172.31.46.48:3306 ubuntu@18.170.229.50
Forward Multiple Ports
You can forward multiple ports through the same tunnel. Suppose, for example, that you also wanted to communicate with a PostgreSQL database on the remote host, then you might create a tunnel like this:
ssh \
  -L 3306:172.31.46.48:3306 \
  -L 5432:172.31.46.48:5432 \
  ubuntu@18.170.229.50
Service on SSH Server
Suppose that, instead of having MySQL running on the remote host it was actually running on the SSH server. In this case the SSH tunnel can be simplified:
# Create an SSH tunnel which will forward port 3306 on local host to port 3306 on the SSH server.
ssh -L 3306:localhost:3306 ubuntu@18.170.229.50
ssh -L 3306:3306 ubuntu@18.170.229.50
Those two commands are equivalent. The localhost in the first command is from the SSH server’s perspective: it’s setting up an SSH tunnel to itself. You could also use 127.0.0.1. However, either option seems somewhat redundant, hence the second command where localhost is omitted.
Conclusion
SSH tunnels provide a robust and secure means for transmitting data over unsecured networks. They are particularly useful for accessing resources like databases within private networks when direct connections are not feasible. By effectively creating a secure and encrypted pathway from a local machine to a remote server, SSH tunnels facilitate safe and private data transmission. The versatility of SSH tunnels make them an indispensable tool for network administrators and developers alike. If you work with remote servers via SSH then you are likely to find a variety of situations in which an SSH tunnel can be useful (even indispensable!).